

How To Draw A Guinea Pig
Have y'all always wanted to know how to depict a guinea sus scrofa? If the respond is yes, and so you have come to the right place! Whether you have had a pet republic of guinea pig or not, you cannot deny their sweet charm. These furry creatures are very friendly and full of life. They too make fantastic subjects to draw. In this easy-to-follow drawing tutorial, we show you how to construct, item, and colour a realistic guinea squealer sketch. Gather your supplies, go into something comfy, and let united states become started!
Table of Content
- one A Footstep-past-Step Republic of guinea Grunter Drawing Tutorial
- one.1 Step one: Amalgam the Main Torso of Your Guinea Pig Sketch
- 1.2 Pace ii: Constructing the Head of Your Republic of guinea Squealer Drawing
- 1.3 Footstep 3: Constructing the Ears of Your Guinea Pig Sketch
- 1.iv Step four: Constructing the Anxiety
- i.5 Step 5: Constructing the Face of Your Guinea Pig Sketch
- 1.6 Step 6: Drawing the Final Outline of the Guinea Pig'southward Head
- 1.7 Step seven: Drawing the Last Outline of the Guinea Pig's Trunk
- ane.8 Step eight: Drawing the Guinea Pig'south Facial Features
- one.9 Stride 9: Drawing Fur Throughout Your Guinea Pig's Body
- 1.x Step ten: Adding the First Coat of Colour
- i.11 Step eleven: Adding Some Lite Contouring
- 1.12 Pace 12: Calculation the Second Coat of Color
- ane.13 Step 13: Calculation Shading to Your Republic of guinea Pig Sketch
- 1.xiv Step 14: Coloring the Details in Your Republic of guinea Pig Drawing
- ane.15 Step xv: Finalizing Your Guinea Pig Sketch
- 2 Often Asked Questions
- 2.one Is It Difficult to Create a Republic of guinea Pig Sketch?
- two.2 How Can I Go the Proportions Right in My Guinea Pig Cartoon?
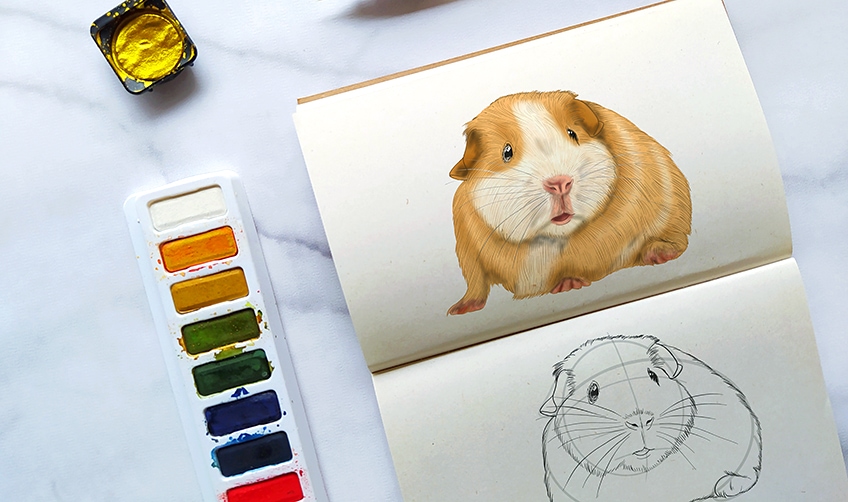
A Footstep-by-Step Guinea Pig Cartoon Tutorial
For this cartoon tutorial, you have the freedom to use any medium you choose, as long as you have colors. You lot tin can use any type of paint, colored pencil, or a graphics tablet. This tutorial is platonic for artists of any level. We cover all the basics of how to draw a guinea pig that is realistic.
This tutorial offers an exploration of perspective, as we are drawing a republic of guinea pig in a twisted position. We need to pay attending to this perspective when constructing each chemical element of this guinea pig drawing, from the head, to the ears and toes.
We begin by using construction lines to map out the basic shape and perspective of the guinea pig cartoon then we go on to create realistic fur detailing. Finally, we use our coloring medium to add together color and dimension to your guinea sus scrofa sketch. At the end of this tutorial, you will have had in-depth practise with creating perspective, and the chance to strop your eyes for item.
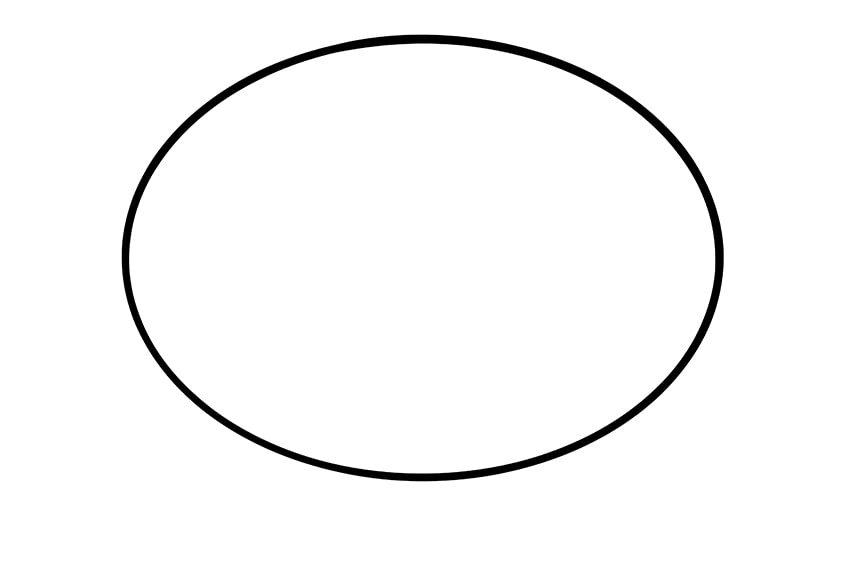
Footstep 1: Amalgam the Main Body of Your Guinea Pig Sketch
In the beginning step of this tutorial, you lot are going to use a simple construction shape to lay the foundations for the main body of your guinea grunter drawing. For this guinea grunter drawing, y'all can use a simple, horizontal oval shape to represent the principal part of the body.
Brand sure that you lot draw this construction oval in the very center of your canvas, leaving enough of space on all sides for the other parts of the guinea pig's body.
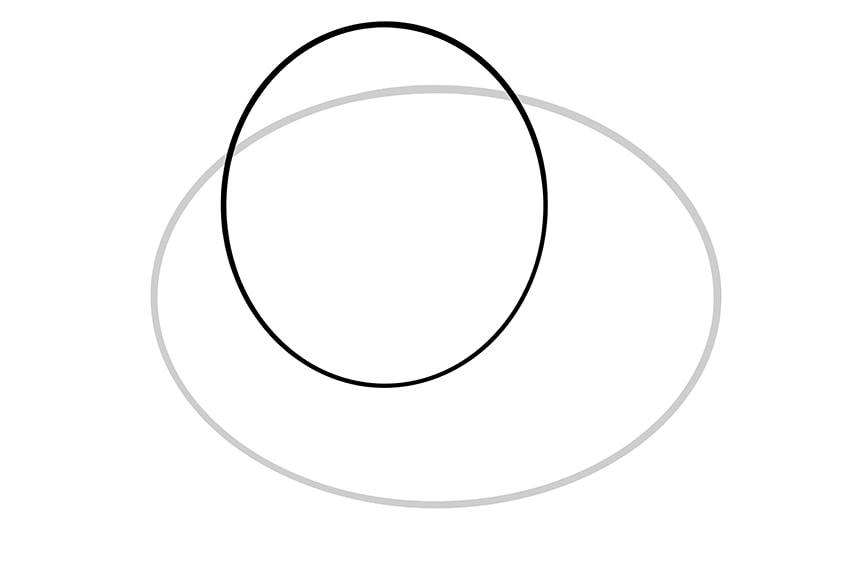
Pace 2: Constructing the Head of Your Republic of guinea Pig Drawing
If y'all turn back to the finished sketch, yous will see that nosotros are drawing the guinea pig from the front. Because of this perspective, we are going to draw the guinea sus scrofa's whole face. You can utilize a very squat oval to lay the foundations for the republic of guinea pig's caput, and the majority of this oval should overlap with the principal body oval.
The guinea pig is at an angle, with its dorsum to the correct of your canvas. To capture this perspective, the head oval should sit in the left ii/3rds of the master body oval.
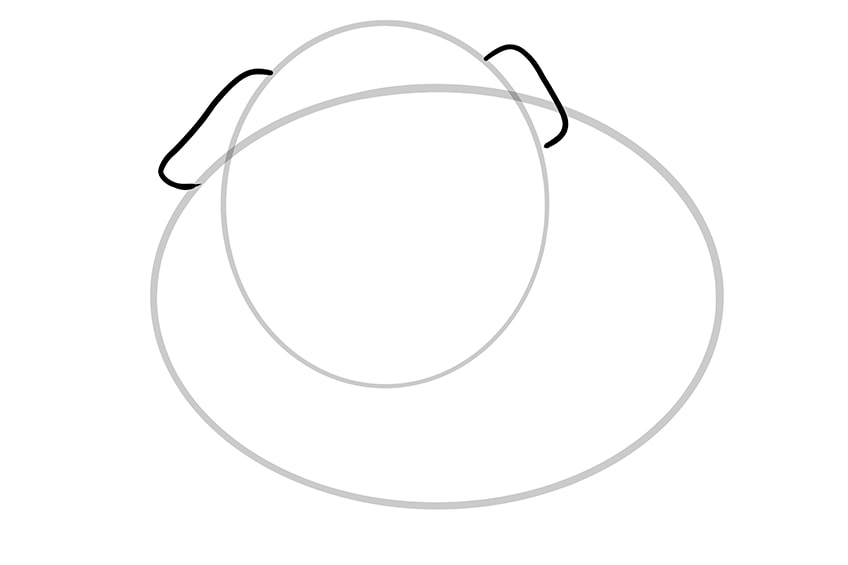
Step 3: Constructing the Ears of Your Guinea Pig Sketch
In this third stride, we need to lay down the shape of the guinea pig'southward ears to emphasize the perspective. On the left side of the guinea pig's caput, draw a fairly long and floppy ear, that ends on the side of the body oval. You can begin the top of the other ear at the same level equally the commencement, but y'all tin can make this ear more rectangular and ending on the side of the caput oval.
The reason for this difference in shape is the slight tilt in the guinea grunter's head, that hides part of the correct ear.
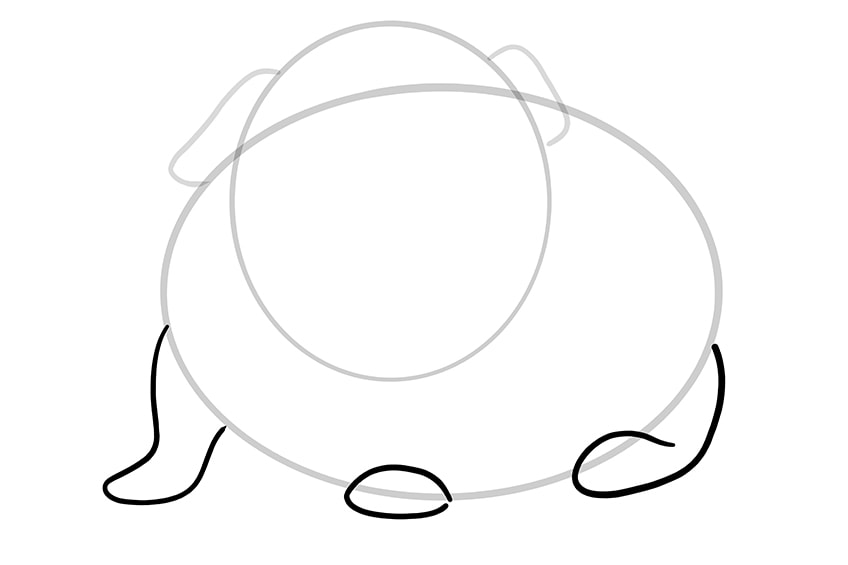
Step 4: Constructing the Feet
Once more, the perspective of our drawing dictates the style that we are going to construct the guinea sus scrofa's feet.
The first thing to note is that the back foot on our left is non visible from this perspective, and the second is that the three visible feet face the left side of the canvas.
Let us brainstorm with the left front end foot, which is the most visible of all three feet. Start from simply beneath the left betoken of the torso oval, taking a curved similar out and down, before sweeping frontwards and back upwards to create a foot. Yous can apply a small uneven oval shape directly below the middle of the caput oval and overlapping with the bottom of the body oval, to stand for the other front foot. For the final dorsum leg, accept a curved line down from the dorsum of the body oval so create a paw shape that overlaps with the body oval.
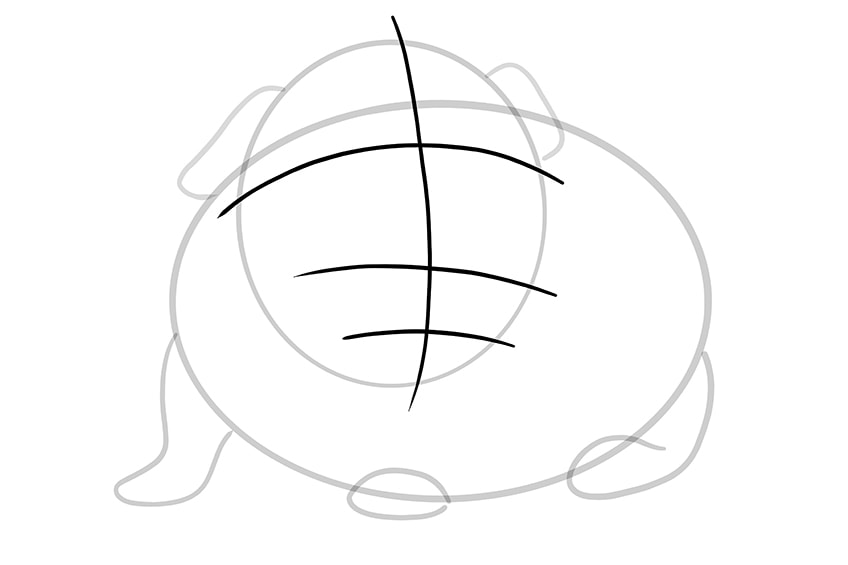
Step v: Constructing the Face of Your Guinea Pig Sketch
In this tutorial, we are drawing the republic of guinea hog'south whole face, but it is at a slight angle. In order to get all of the facial features the correct size and in the right place, we are going to begin past using some construction lines to programme out the confront.
Brainstorm by cartoon a single vertical line through the guinea pig's caput. This line should cross through the central bespeak of both the elevation and bottom of the head oval, just it should curve to the correct. Next, depict a horizontal line that begins low and curves upwards only below the bottom of both ears. Draw another 2 curved horizontal lines towards the bottom of the caput construction oval.
These bottom ii lines should be closer together, equally these are going to help yous depict the olfactory organ and mouth in the next few steps.
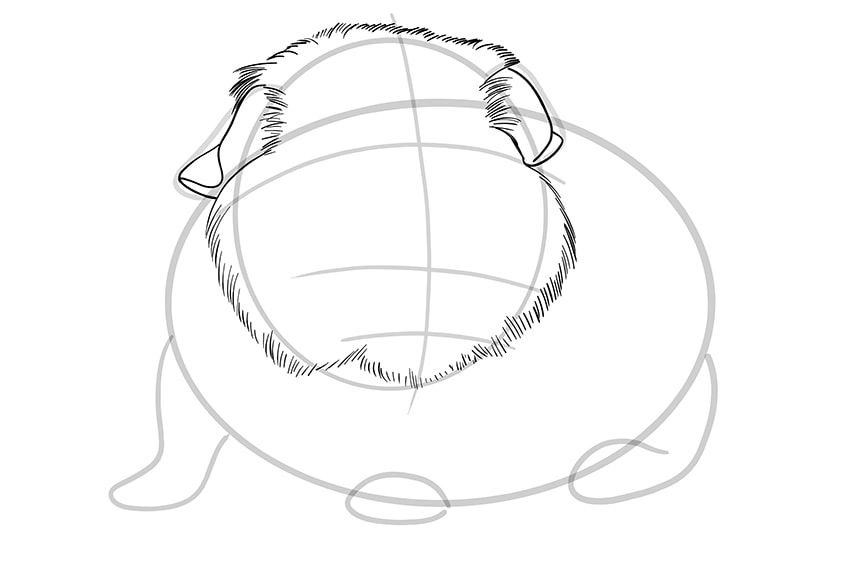
Pace 6: Drawing the Terminal Outline of the Republic of guinea Sus scrofa'southward Head
It is time to begin using all the construction lines that you lot have drawn to create the final outline of your guinea squealer sketch. Although you are creating the final outline, this should not exist a single line. Instead, apply curt strokes to outline the head, giving the impression of fur. Begin at the center of the head and make certain that the fur strokes flow outwards away from this center line on both sides. Yous tin use unmarried smoothen lines to outline the ears, calculation a picayune fold in each.
Y'all will see in our instance below that we have not stuck closely to the structure oval. Practise not be agape to add lumps and bumps to make your drawing more natural and realistic.
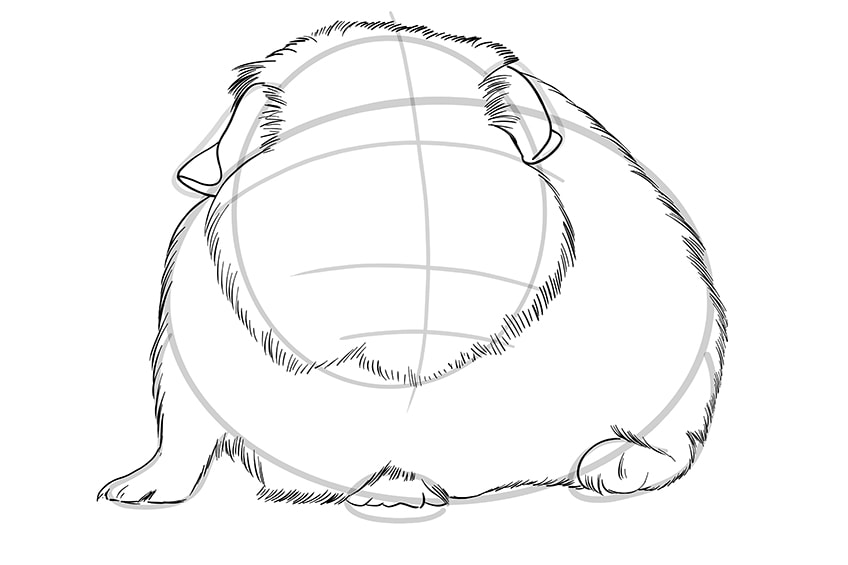
Step 7: Drawing the Final Outline of the Guinea Pig's Body
In much the same way that nosotros outlined the head in the terminal step, use curt hair-like strokes to outline the rest of the republic of guinea grunter's body. The only smooth areas should exist the feet, where y'all tin add together in some toe ornament.
For the greatest sense of realism, apply the curvature of the republic of guinea pig's torso to help y'all draw the hairlines in the right direction. For example, you desire the fur to flow outwards and down the guinea pig's back.
Step viii: Cartoon the Republic of guinea Hog'south Facial Features
In this step, y'all are going to use the structure lines in the face up to add together the facial details. You are going to utilise these lines to help y'all describe the eyes, olfactory organ, and oral fissure.
Brainstorm by using the top construction line as the center point for the two eyes. Use an oval shape that slants to the right to create the left eye and a one-half circumvolve for the right eye. Add some fur strokes around these eyes and a few additional rings to add depth.
Remember to leave a modest blank space in each heart to correspond the reflection in the iris.
For the nostrils, use the middle horizontal structure line as your basis, and add one nostril on either side of the key construction line. Add a little line of fur details to a higher place the nostrils, and yous can add whiskers all around the nose. Finally, use the lesser horizontal line to draw three curved lines to create the rima oris. Add a little chin line beneath the mouth likewise.
When you are happy with your face up details, you can erase any remaining construction lines.

Step ix: Drawing Fur Throughout Your Guinea Pig'due south Body
Although this step is very easy, it is also quite fourth dimension-consuming. It is best not to rush the process, as the more time you take the neater the end result will be. Begin past drawing both straight and curved hairlines from around the nose. These hairs should get outwards in all directions, following the curvature of the guinea pig's face. As you become to the guinea squealer'south body, you lot tin can utilise slightly longer hairlines. Leave the ears, nose, oral fissure, and anxiety clear from hair.
Throughout this step, brand sure that you are following the curvature of the guinea pig's torso. You tin can exit little gaps throughout the hair as you can meet in the example beneath considering these will assistance y'all place highlights later.
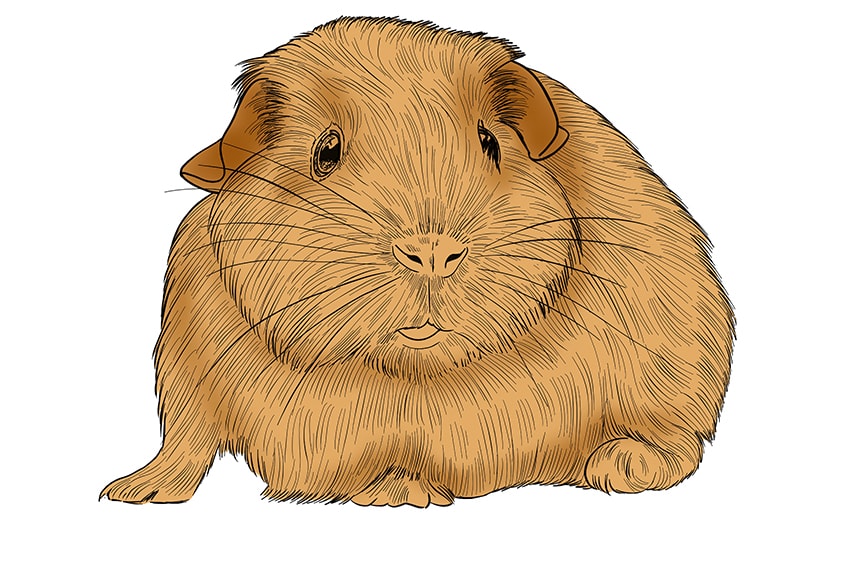
Step x: Adding the Get-go Coat of Colour
In club to achieve realistic coloring, you need to build up the color in a few steps. In this kickoff coloring pace, employ a very light shade of brown or caramel to add a base color to the entirety of your guinea squealer drawing. You desire this coat to be equally smooth as possible.
You are, of course, welcome to make your republic of guinea pig any color you like. Which always color you choose to utilise, this offset colour should exist very low-cal as nosotros are going to add darker colors in the adjacent few steps.

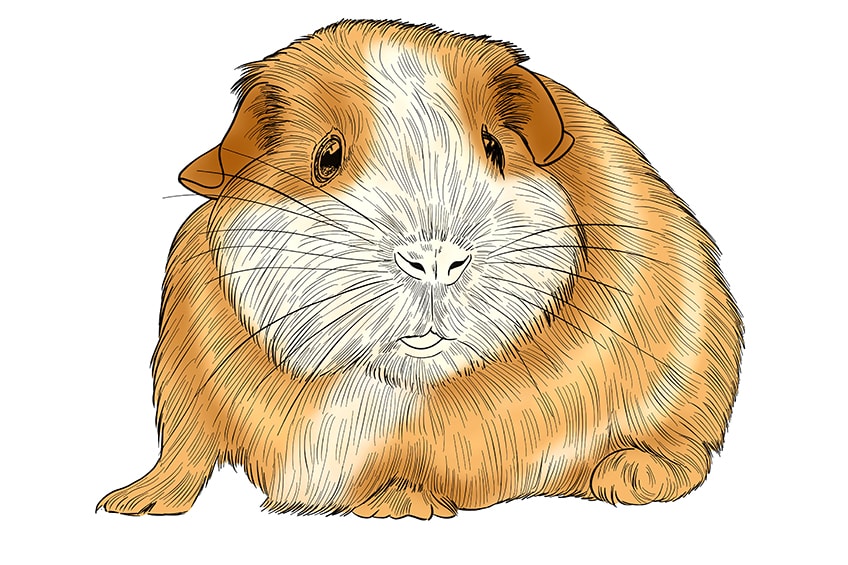
Pace 11: Adding Some Light Contouring
In this step, find a calorie-free black paint and employ information technology to lightly add a affect of shading effectually the frame of the guinea hog's body. Focus this shading around the guinea pig's eyes, the bottom of the head, and around the bottom of the guinea pig'southward body. Give the ears another coat of light brown.
Call back to proceed this shading low-cal, as information technology is difficult to remove it but always like shooting fish in a barrel to add more than if necessary.
Step 12: Adding the Second Glaze of Colour
For the 2d color coat, you need a vibrant white shade. You are going to add this white to the center of the guinea grunter's face, and all around its cheeks. You can as well add a stripe of white downwards the guinea grunter's chest, and use it to highlight the lines you left in the hair detailing. .
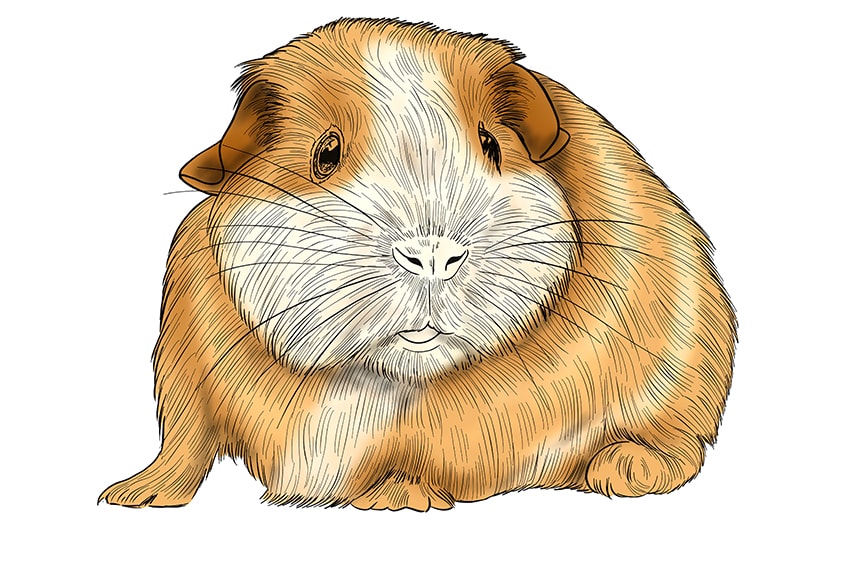
Step 13: Adding Shading to Your Guinea Hog Sketch
In this step, you are going to use a touch of black again to retouch the contouring you lot did in the last shading stride. Very gently, add together more shading around the base of the ears, below the head, and around the anxiety.
Stride 14: Coloring the Details in Your Guinea Pig Drawing
For this step, you are going to need a light pink shade, blackness, and white to colour your details. Begin with a precipitous brush and add a dab of your white shade to the reflection in each eye. Next, apply a small brush to add together your low-cal pinkish to the nose and oral cavity area of your guinea pig drawing. You tin add a 2nd glaze of this pink down the centre of the nose and in the oral cavity, and add some black to the nostrils.
Finally, y'all tin paint the bottom of the paws with this pinkish shade, blending information technology up into your other colors.
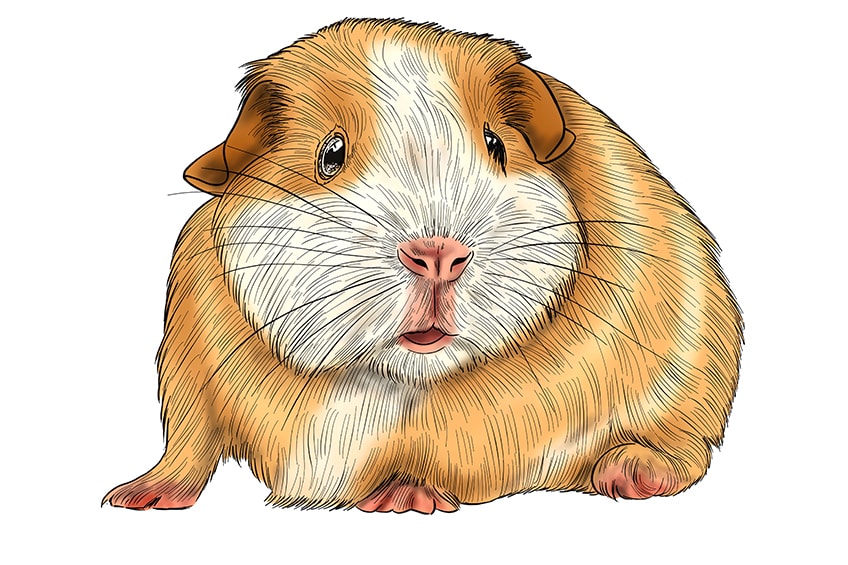
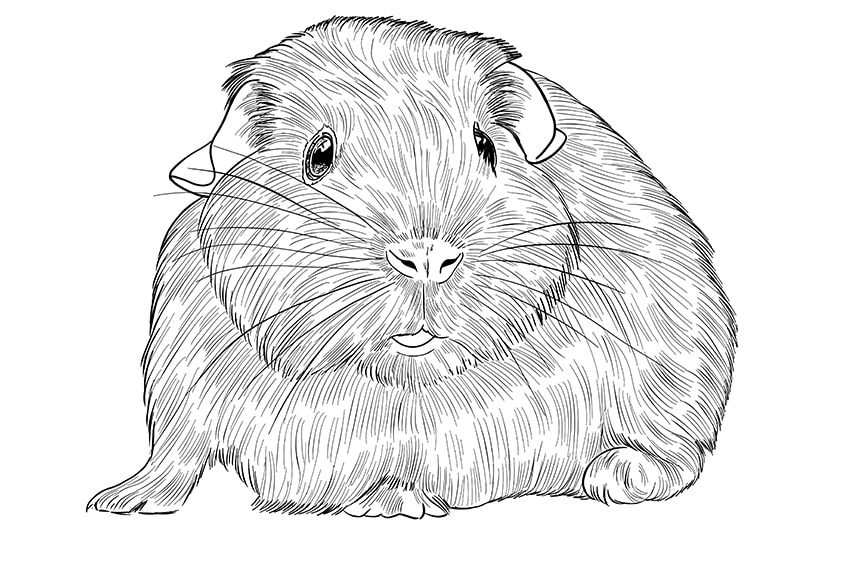
Step 15: Finalizing Your Guinea Pig Sketch
In this last step, you are going to trace some of your fur strokes with light grey paint to brand them appear more natural. Yous can too remove the outline of your drawing by painting it over with the respective colour. These final touches volition drag your guinea squealer cartoon, making it look more realistic and natural.
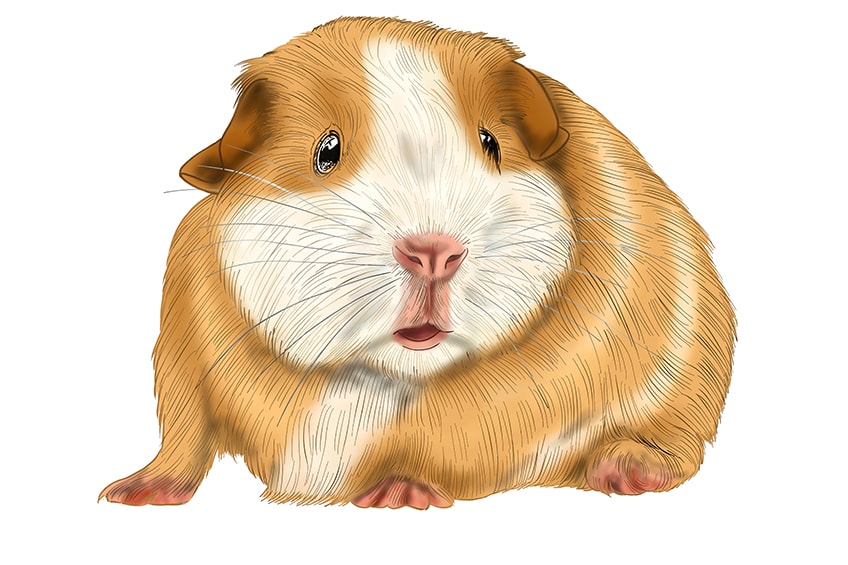
Congratulations for coming to the end of this in-depth guinea grunter drawing tutorial. We hope that y'all have enjoyed experimenting with perspective and adding details, and that you at present feel more than confident planning and executing drawings of all kinds.
Ofttimes Asked Questions
Is Information technology Difficult to Create a Guinea Grunter Sketch?
Learning how to draw a guinea sus scrofa is no more difficult than cartoon any other animal. In fact, thanks to their fairly simple shape, guinea pigs can make great subjects for those who are new to animal drawing.
How Can I Get the Proportions Right in My Guinea Pig Cartoon?
For all of our animal drawing tutorials, we always begin by using structure lines and shapes. Structure lines are the all-time way to make sure that you lot have got the proportions and dimensions spot on earlier you start calculation details. There is nothing worse than creating a beautifully intricate drawing of the head, and then finding that yous have not left enough space for the body.

Source: https://artincontext.org/how-to-draw-a-guinea-pig/
Posted by: garretttennesers69.blogspot.com
0 Response to "How To Draw A Guinea Pig"
Post a Comment